Marketing popup
What it does
Section titled “What it does”Marketing popup displays a dismissible invitation over the page. Combine a photo, heading, short description, and email form to invite subscribers. Add a separate Offer highlight to emphasize a real offer such as “10% OFF.”
This is an email signup, not customer account registration. It collects email addresses; welcome emails and campaigns need a separate setup in your email tool. Displaying an offer does not create a discount, and entering a code does not automatically apply it to the cart.
| Entry | Best for | Where to configure it |
|---|---|---|
| Marketing popup | An invitation shown according to pages, devices, and frequency | Overlays → Marketing popup |
| Newsletter | A signup section that stays visible within a page | Current template → Newsletter |
| Newsletter signup | A signup form in the footer | Footer → Newsletter signup |
Add it to a page
Section titled “Add it to a page”Prepare your content
Section titled “Prepare your content”- Prepare a heading, one sentence describing the actual subscription benefit, and marketing consent text. Do not describe an email signup as creating a membership account.
- This walkthrough uses the included pet photo, so no upload is required. To use your own image, prepare a portrait around 1000 × 1400 px, with the person or pet near the center.
- Check your privacy policy in Shopify Settings → Policies. Add and save it first if missing. Alternatively, prepare the URL of your own privacy policy page.
- The invitation example needs no products, collections, menus, or discounts. Only create and test a discount if you intend to promise one, as explained in the offer example below.
Find the right level
Section titled “Find the right level”- In Shopify admin, open Online Store → Themes, find the Pawglade theme you want to edit, and click Edit theme (some interfaces call this Customize).
- Select Home page at the top, open Sections, and scroll to Overlays. Do not add this popup inside the homepage content list or Footer.
- If Marketing popup already exists, expand it and continue from step 2 of the next section. The theme includes an invitation setup; an existing store may have changed it. Do not delete a saved campaign just to follow this tutorial.
- If Overlays has no popup, click Add section under Overlays, search for
Popup, and choose Popup: invitation. The new instance retains the name Popup: invitation. Popup: welcome offer is another starting arrangement, not a separate feature. - To match the names used below, double-click Popup: invitation at the top of its settings panel, rename it Marketing popup, and press Enter. The included instance is already named Marketing popup and needs no rename. If you keep the starting name, Marketing popup in the following steps means that instance.
Keep at most one Marketing popup per theme. Its configuration is shared across pages, so changing templates does not require another instance. If Overlays or these choices are missing, check that you opened a Pawglade theme containing this feature; Newsletter is not a replacement.
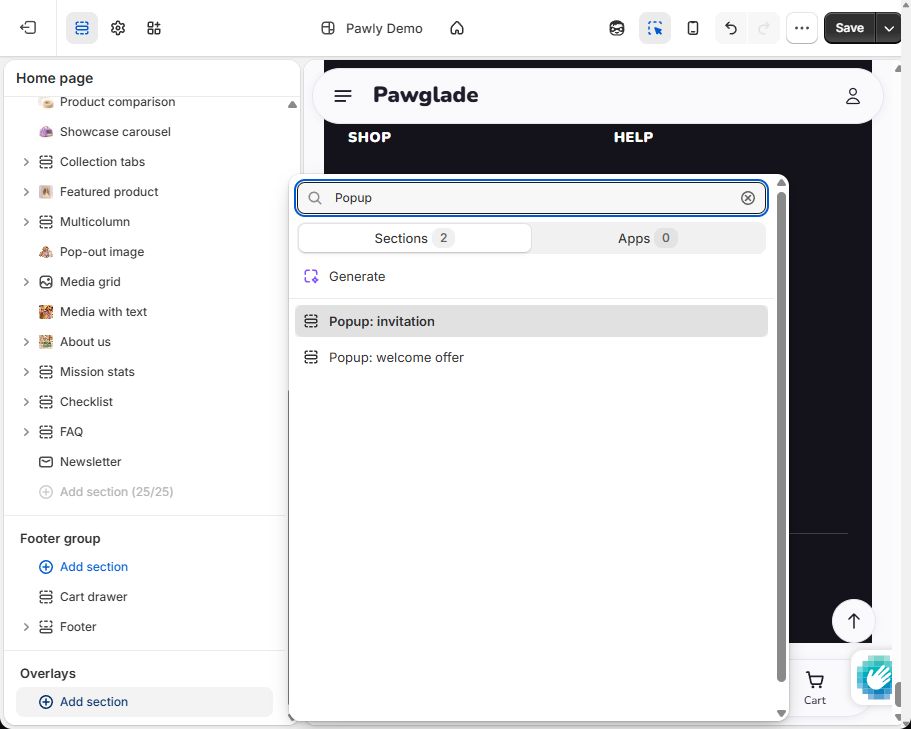
After adding the invitation arrangement, the target structure is:
Overlays└─ Marketing popup ├─ Display rules (fixed targeting and timing) ├─ Brand name ├─ Popup heading ├─ Popup text └─ Popup signupThe section controls the frame, photo, and layout. Display rules controls when and to whom it appears; the remaining content blocks follow their list order. Display rules adds no visible row inside the shopper’s popup.
Choose a style
Section titled “Choose a style”| Layout | On wider screens | Related settings |
|---|---|---|
| Split | Photo and content side by side | Desktop width, Desktop image position |
| Stacked | Photo above the content | Image at the top, up to 560 px wide |
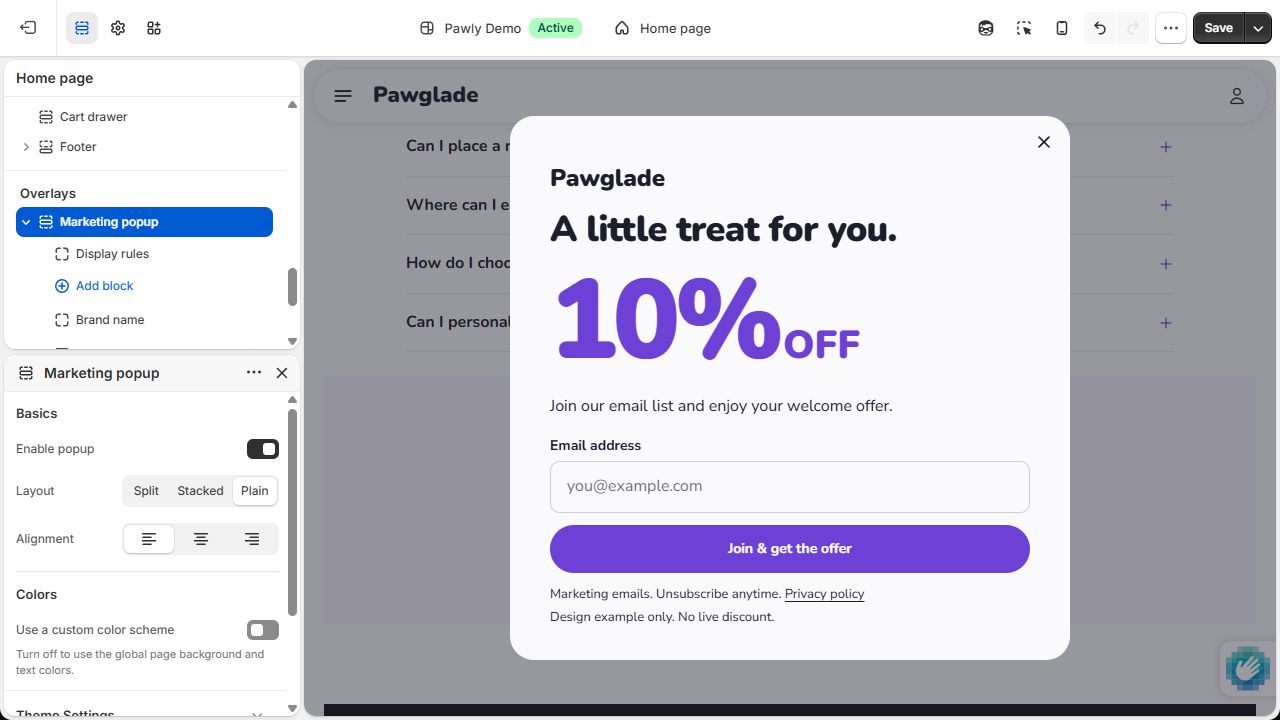
| Plain | Content without a photo | Image and mobile image settings hidden, up to 560 px wide |
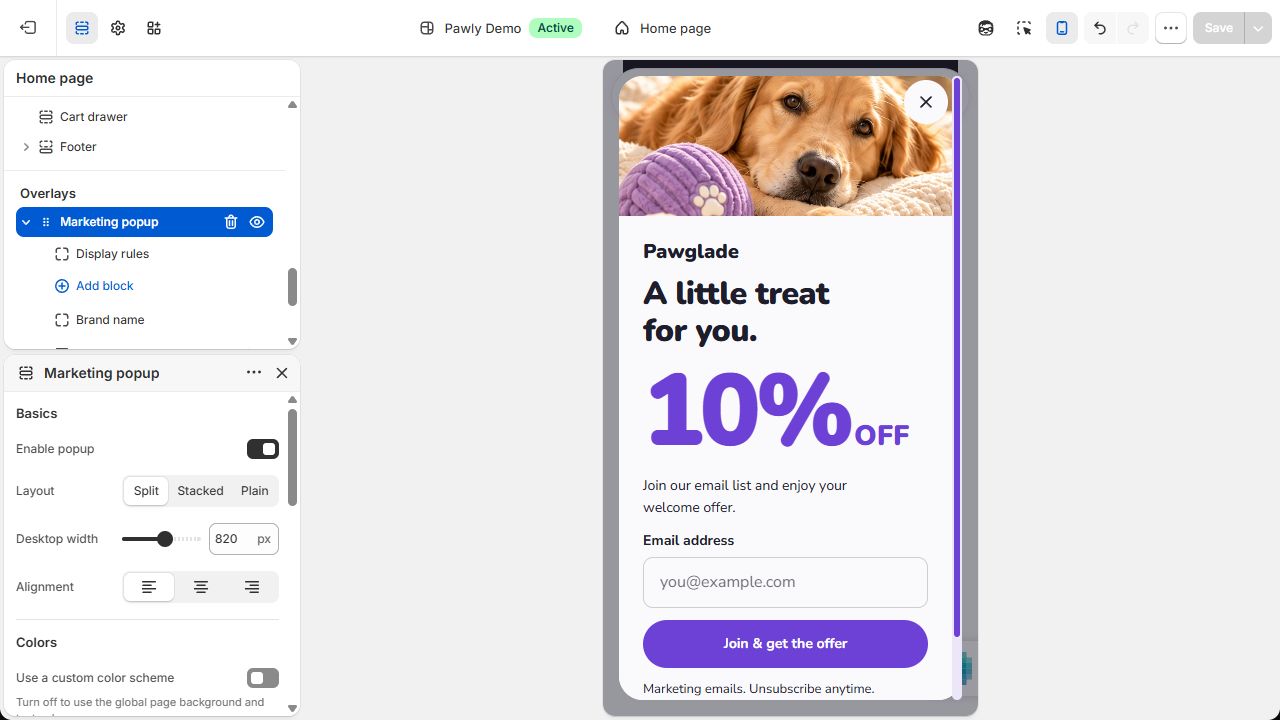
On phones, the photo sits above the form. Turn off Show image on mobile to omit it. Split’s left/right position does not change the phone order. Switching layouts preserves hidden settings, which are used again when you switch back.
Set it up: quick start
Section titled “Set it up: quick start”A. Build an invitation from scratch
Section titled “A. Build an invitation from scratch”- Add Popup: invitation as described above, or expand the existing Marketing popup. Check that it contains the four content blocks shown in the structure. Add any missing type with Add block inside Marketing popup.
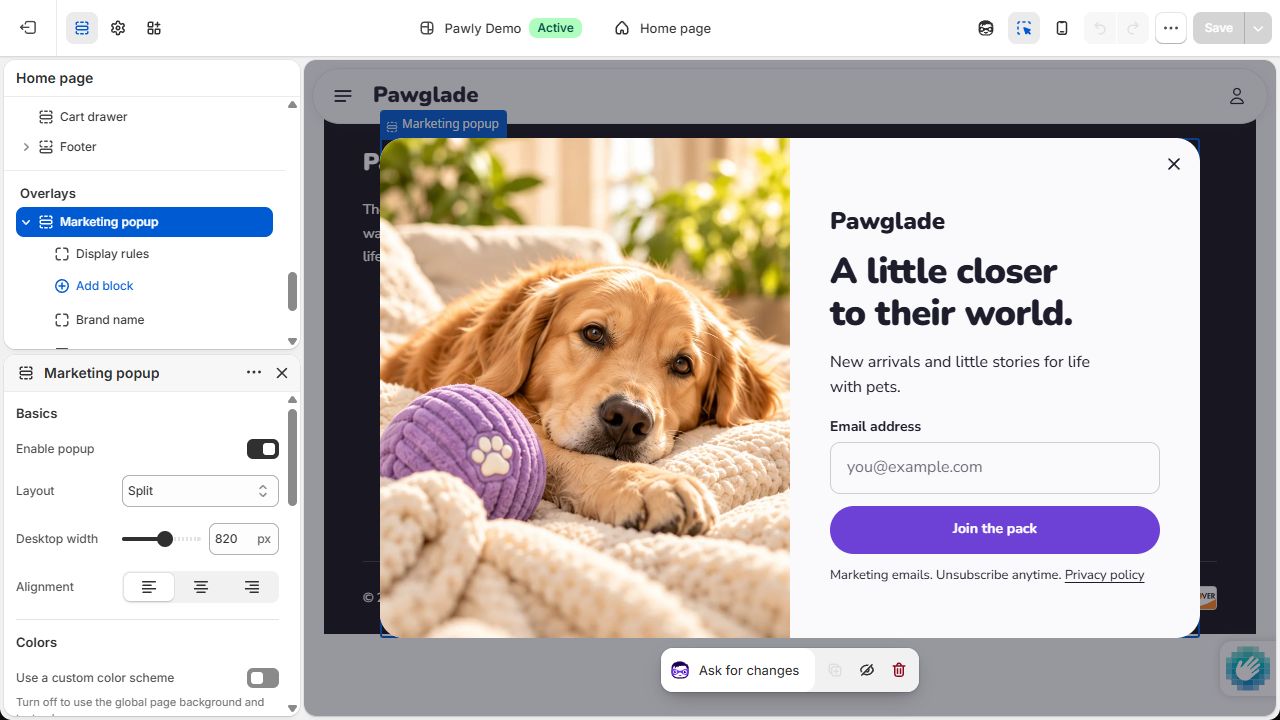
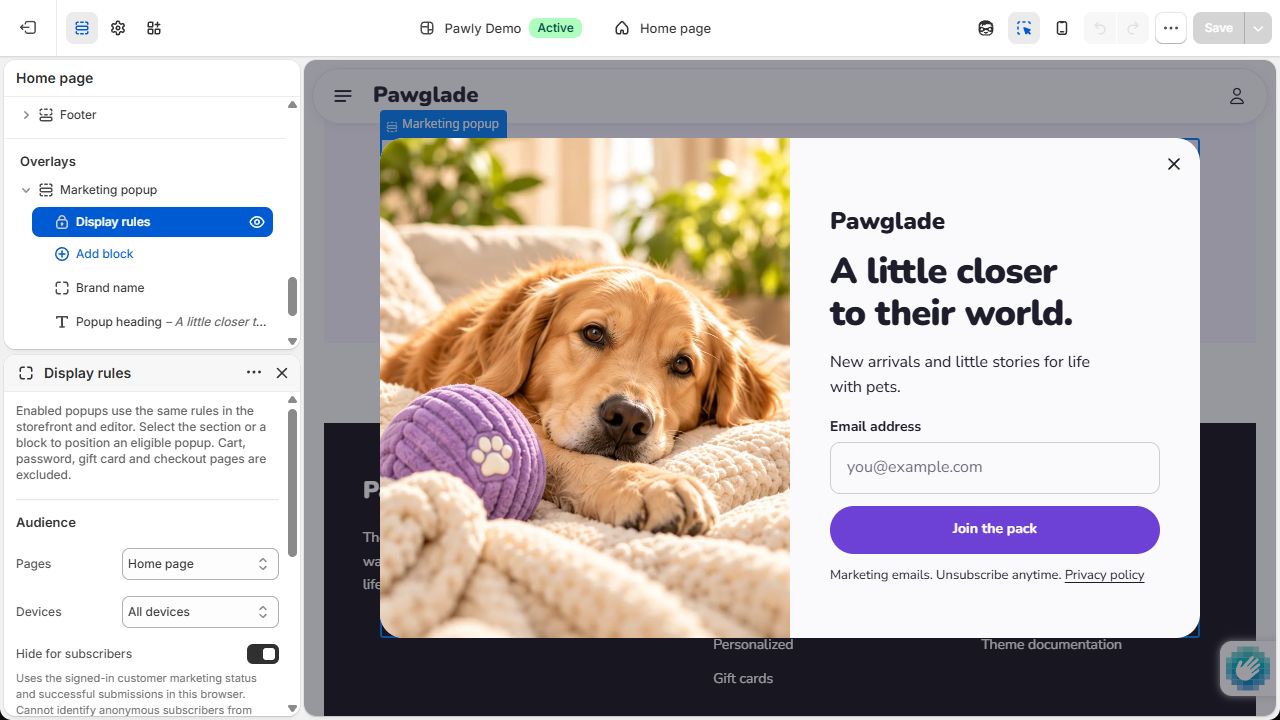
- Click Marketing popup. Under Basics, turn on Enable popup, choose Layout = Split, and set Desktop width = 820 px and Alignment = Left. A newly added section starts disabled; the invitation instance included with the theme is enabled. These are different starting states.
- Leave Use a custom color scheme off. Under Image, leave the image empty, keep Use theme image when no image is selected on, and choose Desktop image position = Left. Under Mobile, keep Show image on mobile on.
- Click Brand name and leave its field empty to use your store name.
- Click Popup heading. Set Heading to
A little closer to their world.and Text size = 36 px. - Return to the list and click Popup text. Set Text to
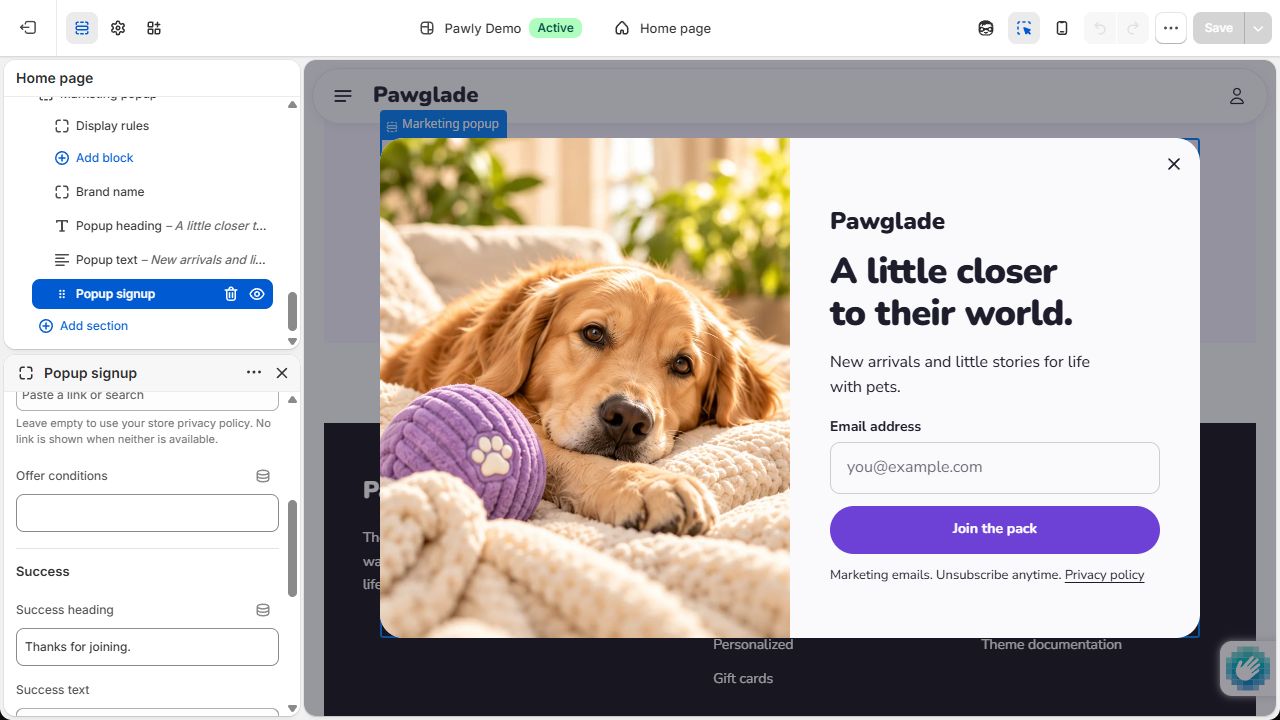
New arrivals and little stories for life with pets.and Text size = Body. - Click Popup signup. Under Signup, set Submit button label = Join the pack and retain or write accurate Marketing consent text. An empty Privacy policy link uses your store privacy policy; select or paste your own page URL here if needed. Leave Offer conditions empty.
- In the same block, retain the default Success heading and text. Leave Discount code → Existing discount code empty. When adapting an old campaign, check and clear Discount code conditions before clearing the old code. Removing the large offer alone does not remove other discount promises.
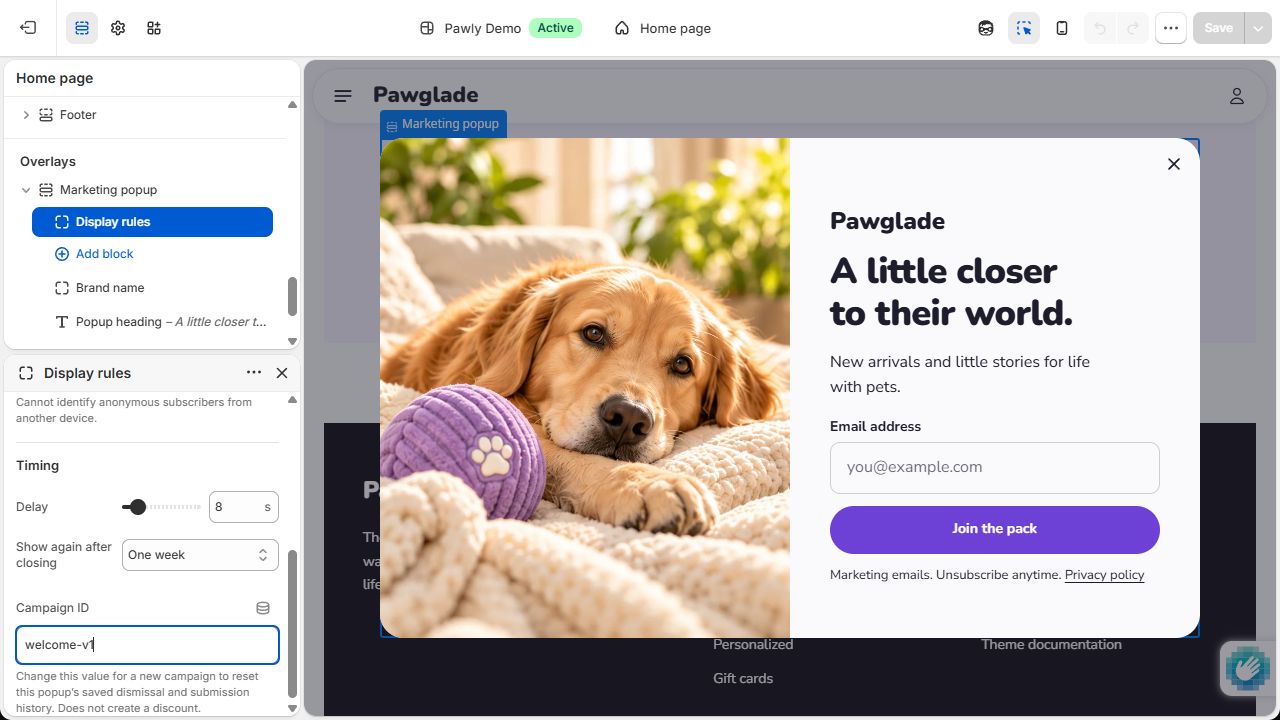
- Click the fixed Display rules block. Under Audience, choose Pages = Home page, Devices = All devices, and turn on Hide for subscribers. Under Timing, set Delay = 8 s, Show again after closing = One week, and Campaign ID = welcome-v1. Use a new campaign ID if replacing an existing campaign.
- Click Save at the top and wait for it to finish. Reopen Marketing popup to confirm your text, layout, and rules were saved.
Checkpoint: Selecting an enabled section or content block can position the real popup when its page and device conditions match. It should show a photo, store name, heading, description, and one email form, without an offer number. Disabling the section, hiding Display rules, or removing all content does not produce an editor-only placeholder.
B. Check the actual storefront
Section titled “B. Check the actual storefront”- Open the theme’s storefront preview on the homepage and keep the tab visible for about 8 seconds. Avoid opening the cart or another overlay, or filling in another form at the same time.
- Close the popup and reload. The same campaign should not appear automatically again for a week. Positioning it in the editor is different from automatic display on the storefront.
- For repeated checks, temporarily set Show again after closing = Next page load and use a new test Campaign ID. Save and reload. This option still does not repeatedly reopen it on the same page.
- Switch to phone preview and check the photo, text, buttons, and close control at around 375 px wide. Short screens allow scrolling inside the popup.
- Submit an email address you can receive mail at. Find it in Shopify Customers and check its email marketing status. If double opt-in is enabled, complete the steps in the confirmation email. On-page submission feedback does not mean the confirmation link was clicked or a welcome email was delivered.
- After testing, restore One week, the real Campaign ID, and Hide for subscribers, then save again. Do not leave frequent display settings enabled for shoppers just for screenshots.
Settings
Section titled “Settings”Defaults describe a newly added section or content block. Saved store settings and the other starting arrangement can differ.
Section settings
Section titled “Section settings”Basics
| Setting | Default | Options | What it does |
|---|---|---|---|
| Enable popup | Off | On / Off | Main switch. The invitation instance included with the theme is On. |
| Layout | Split | Split / Stacked / Plain | Frame and photo arrangement. |
| Desktop width | 820 px | 600–1000 px, step 20 px | Split only. Maximum width with a photo, limited by the screen. Without a photo, up to 560 px. |
| Alignment | Left | Left / Center / Right | Alignment of content and the offer line. |
Colors
| Setting | Default | Options | What it does |
|---|---|---|---|
| Use a custom color scheme | Off | On / Off | When off, uses the theme’s page background and text colors. |
| Color scheme | Scheme 1 | Store color schemes | Shown only when the switch above is on. Controls the panel background and text; buttons and accents still follow the theme. |
Image / Mobile
| Setting | Default | Options | What it does |
|---|---|---|---|
| Image | Empty | Image | Shown outside Plain. Your selected image takes priority. |
| Use theme image when no image is selected | On | On / Off | Shown outside Plain when Image is empty. Uses the included pet photo. Off with no selected image gives a single column. |
| Desktop image position | Left | Left / Right | Split only. Left/right placement on wider screens. |
| Show image on mobile | On | On / Off | Shown outside Plain. Off omits the photo and its loading on phones. |
Display rules
Section titled “Display rules”Click this fixed block under Marketing popup to configure it. Do not hide it.
| Setting | Default | Options | What it does |
|---|---|---|---|
| Pages | Home page | Home page / All storefront pages / Product pages / Collection pages | Audience: page targeting. Excludes the cart, password, gift card redemption page, and checkout. |
| Devices | All devices | All devices / Desktop / Mobile | Audience: device targeting. |
| Hide for subscribers | On | On / Off | Audience: hides signed-in subscribers and people who successfully submitted this campaign in this browser. Cannot identify anonymous subscribers on another device. |
| Delay | 8 s | 0–60 s | Timing: counts time while the page is visible; pauses in a hidden tab. |
| Show again after closing | One week | Next browsing session / One day / One week / Next page load | Timing: interval after dismissal. One day is 24 hours; one week is 7 days. |
| Campaign ID | welcome-v1 | Text | Timing: a new unique campaign ID uses new dismissal and submission records. Does not create a discount. |
Blocks
Section titled “Blocks”Use Add block inside Marketing popup and drag content blocks into position. The shared limit is 12 addable content blocks, rather than one of each type. Use one signup form to avoid repeated invitations.
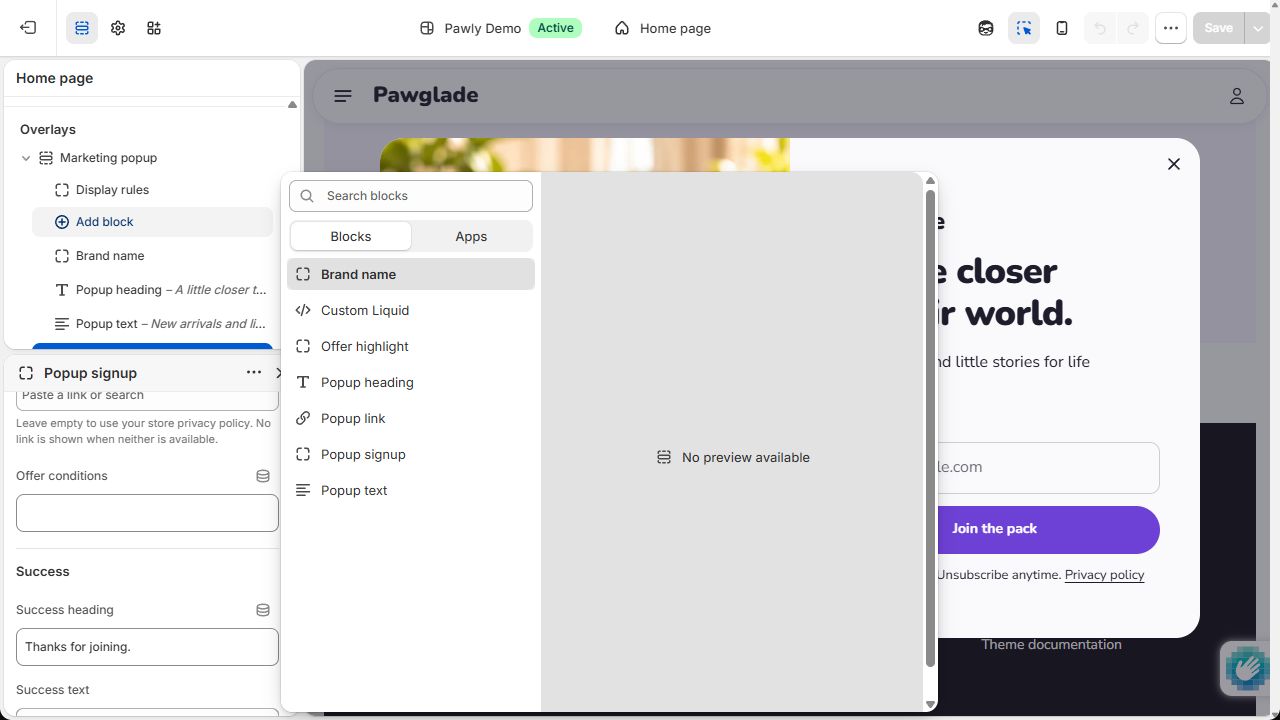
| Block | Limit | What it adds |
|---|---|---|
| Brand name | Shared 12 | Store name or custom brand text. |
| Popup heading | Shared 12 | A heading with adjustable size. |
| Offer highlight | Shared 12 | A separate large value, short suffix, and note. |
| Popup text | Shared 12 | Body copy or small text. |
| Popup signup | Shared 12 | Email form, feedback, and optional discount code. |
| Popup link | Shared 12 | Additional text link or button. |
| Custom Liquid | Shared 12 | Optional custom content; requires coding knowledge. |
Brand name
| Setting | Default | Options | What it does |
|---|---|---|---|
| Brand name | Empty | Text | Empty uses your store name. |
Popup heading
| Setting | Default | Options | What it does |
|---|---|---|---|
| Heading | A little closer to their world. | Text | Heading; hidden when empty. |
| Text size | 36 px | 24–48 px, step 2 px | Desktop size, capped at 32 px on phones. |
Offer highlight
| Setting | Default | Options | What it does |
|---|---|---|---|
| Main text | 10% | Text | Main value, such as a real percentage or amount. Empty hides the entire block. |
| Supporting text | OFF | Text | Short supporting text; can be empty. |
| Note | Empty | Text | Optional explanation. |
| Main text size | 112 px | 40–120 px, step 4 px | Main value size; reduced to fit phone space. |
| Text color | Accent | Accent / Inherit text color | Theme accent or the current text color. |
Popup text
| Setting | Default | Options | What it does |
|---|---|---|---|
| Text | New arrivals and little stories for life with pets. | Rich text | Short description; hidden when empty. |
| Text size | Body | Body / Small | Body or supporting small text. |
Popup signup
| Setting | Default | Options | What it does |
|---|---|---|---|
| Submit button label | Join the pack | Text | Signup: submit button text. |
| Marketing consent text | Marketing emails. Unsubscribe anytime. | Multiline text | Signup: accurately describe marketing subscription and unsubscribing. |
| Privacy policy link | Empty | Link | Signup: empty uses your store privacy policy. No link if neither exists. |
| Offer conditions | Empty | Text | Signup: actual conditions shown before submission; optional for invitations. |
| Success heading | Thanks for joining. | Text | Success: shown after a successful platform response. |
| Success text | If confirmation is required, check your inbox. | Multiline text | Success: feedback; do not confuse submission with email confirmation. |
| Existing discount code | Empty | Text | Discount code: an existing shared code shown with a copy control after success. Not created or automatically applied. |
| Discount code conditions | Empty | Text | Discount code: this setting appears only with a nonempty code. Conditions shown with the code after success. |
Popup link
| Setting | Default | Options | What it does |
|---|---|---|---|
| Label | Explore the collection | Text | Link text. |
| Link | Empty | Link | Select your page or collection. The block is hidden if either the text or destination is empty. |
| Style | Text link | Text link / Primary button | Text link or primary button. |
Custom Liquid
| Setting | Default | Options | What it does |
|---|---|---|---|
| Custom Liquid | Empty | Custom code | Hidden when empty. Duplicate the theme before editing. Test third-party forms according to their provider’s instructions; do not nest another form inside the signup form. |
Images and content tips
Section titled “Images and content tips”- Prepare a portrait around 1000 × 1400 px with the subject centered. Keep essential wording in the content rather than inside the image.
- Outside Plain, open Marketing popup → Image and click Select to choose an uploaded image, or upload and select your file in the picker. Save and check both desktop and phone crops. Selecting an image hides the included-image fallback switch, and your image takes priority.
- To restore the included image, clear Image and turn on Use theme image when no image is selected. For no photo, choose Plain, or clear the image and turn off that fallback switch.
- Phones use a short landscape crop rather than the full portrait. Keep the subject near the center; shorten long copy instead of making it very small.
Images load when the popup opens. Turning off the mobile photo also prevents its loading on phones. The photo, heading, offer value, and form already establish the hierarchy; extra badges and repeated conditions are usually unnecessary.
Good to know
Section titled “Good to know”- Closing the popup lets shoppers continue browsing. Without scripts, it does not open automatically. Keep an in-page Newsletter or footer signup as another entry.
- It waits when another overlay is open or a shopper is filling in another form. Mismatched page/device rules, a disabled section, or hidden Display rules do not become eligible simply because you select it in the editor.
- If browser storage is blocked or cleared, cross-page dismissal history cannot be guaranteed. Shoppers can still close it on the current page.
- Existing discount code is a public shared code, not a secret available only after subscribing or a unique single-use code per person. Showing it on the success screen does not hide it from page source. Use an email tool that supports your required confirmation and unique-code workflow.
- Form submission, email confirmation, welcome email delivery, and discount redemption are separate steps. Test each against your actual store rules before publishing. Shopify’s contact information and double opt-in guidance explains marketing status.
Example setups
Section titled “Example setups”Example one: photo invitation without an offer
Section titled “Example one: photo invitation without an offer”Use the quick-start target structure. Choose Split / 820 px / Left, the included photo, and show it on phones. Heading: A little closer to their world. Description: New arrivals and little stories for life with pets. Button: Join the pack. Do not add Offer highlight. Leave Offer conditions and Existing discount code empty. Use Home page / All devices / 8 s / One week / Hide for subscribers = On.
Example two: photo invitation with a bold offer
Section titled “Example two: photo invitation with a bold offer”Prepare a real discount first: In Shopify Discounts → Create discount, create an appropriate percentage code, such as a code you choose to name WELCOME10. Set the actual percentage, eligible products or orders, customer eligibility, minimum requirements, usage limits, active dates, and combination rules. Save and test before adding it to the popup. WELCOME10 is an example, not a working code included with the theme. “One use per customer” does not by itself mean “first order only.” See Shopify’s amount off discount guide.
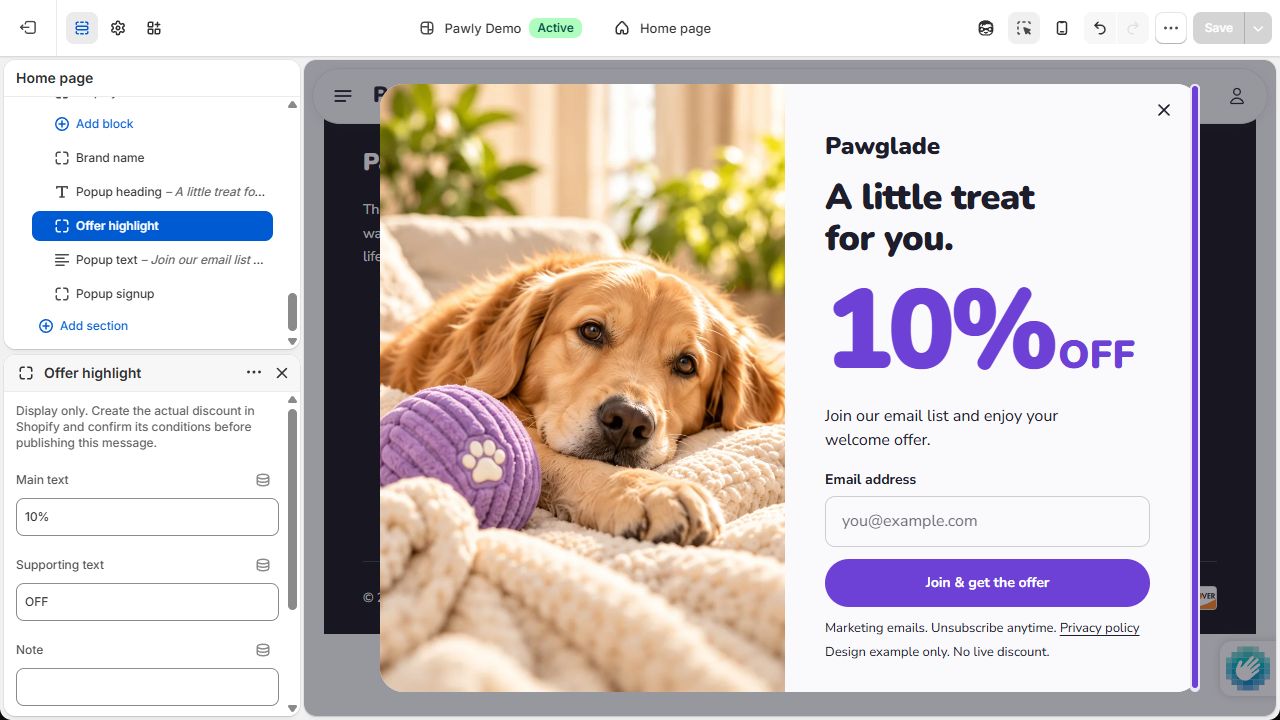
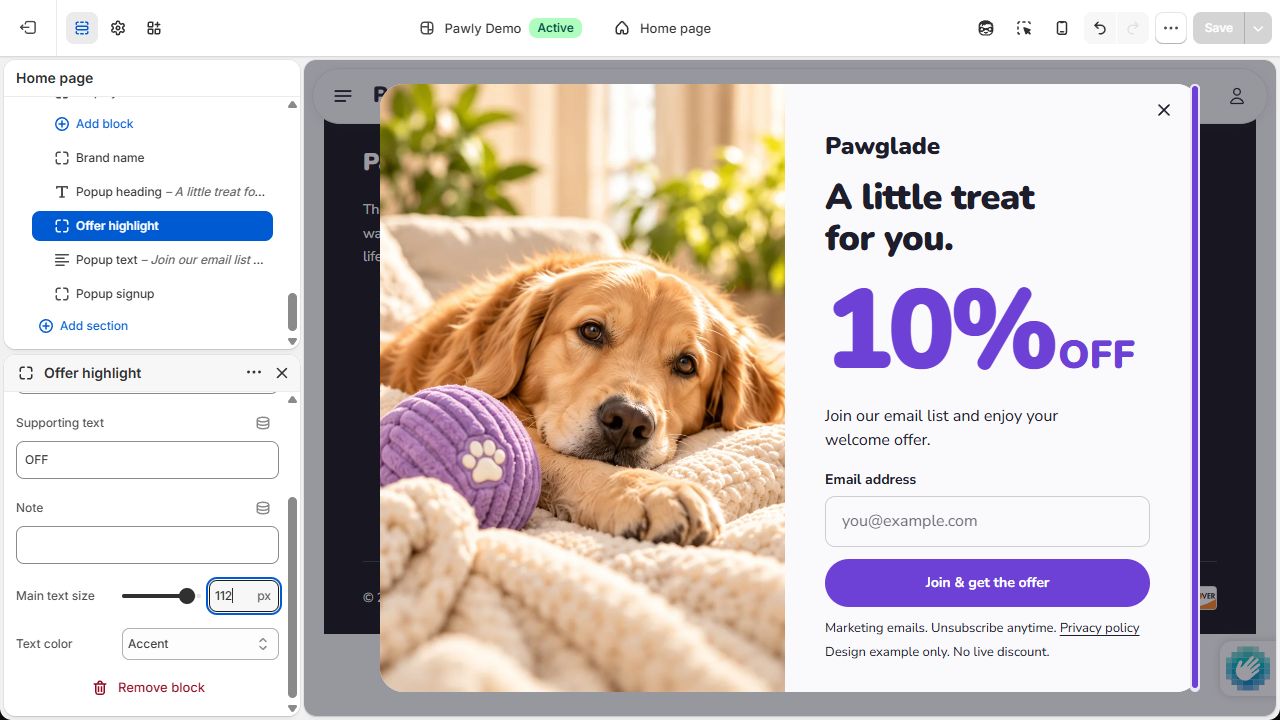
- Start from the invitation example. In Marketing popup’s content list, move the pointer between Popup heading and Popup text. Click the Add block plus that appears and choose Offer highlight to insert it there. Adding from the top of the list may place it before Brand name; drag it after the heading and before the body. The insertion position depends on the Add block entry you click, and is not always the end.
- Set Main text = 10%, Supporting text = OFF, Main text size = 112 px, and Text color = Accent. Leave Note empty. All values must match the real discount you saved.
- Change Popup heading to
A little treat for you.and Popup text toJoin our email list and enjoy your welcome offer.. - In Popup signup, set Submit button label = Join & get the offer. Write the real Offer conditions. Do not say “first order only” or “all products” unless those rules are actually configured.
- To show a shared code after success, enter the code you actually created and tested in Existing discount code, then fill Discount code conditions. If an email tool delivers codes instead, leave this empty and explain the actual delivery method in your copy.
- Change Campaign ID to, for example,
welcome-offer-01. Keep the other live rules, save, and reopen. The target order is Brand name → Popup heading → Offer highlight → Popup text → Popup signup, with fixed Display rules retained. - Test desktop, phone, the actual email status, and discount redemption. To return to an invitation, remove or hide Offer highlight and clear offer promises from the heading, body, button, pre-submit conditions, code, and code conditions. Save again.
These real operation screenshots use the same demonstration setup. To avoid presenting an example as an active promotion, Offer conditions says Design example only. No live discount. and Existing discount code is empty. Replace it with your actual conditions for a real campaign. The screenshots do not mean WELCOME10 already exists or verify email delivery or discount redemption.
Common questions
Section titled “Common questions”Why is the popup missing? Check in order: correct theme → Marketing popup under Overlays → section visible and Enable popup on → Display rules not hidden → page and device match → subscriber status and dismissal interval → other overlays or an active form. A new test Campaign ID helps with testing; do not repeatedly change a live campaign to bypass shoppers’ dismissal history.
Why is Marketing popup missing from Add section? Search for Popup in Overlays and find Popup: invitation or Popup: welcome offer. A new instance retains its starting name; this tutorial renames it Marketing popup. The included instance already uses that name. If one exists, find it instead of adding another.
How do I show an invitation without “10%”? Remove or hide Offer highlight and clear offer promises in the other blocks. The heading and form do not depend on an offer block.
Did Plain delete my settings? The image group, mobile photo switch, split width, and left/right position hide according to the layout. Their values remain saved. Switch back to Split to see them.
Why did a subscriber receive no welcome email or code? Check the email and marketing status in Customers, then double opt-in mail, spam folders, and your email tool’s welcome workflow. The theme sends no welcome email and generates no unique code. It does not show a code without a successful response. Shopify determines duplicate-address responses; the same error wording is not guaranteed every time.
Can I use custom content or an app form? Add and reorder the available content blocks, or use Custom Liquid. Arbitrary app content blocks cannot be added directly. Configure and test third-party forms, scripts, and code delivery according to their provider’s instructions.