Custom option
What it does
Section titled “What it does”Custom option adds shopper-entered personalization to the Product purchase area. Each field travels with the item added to the cart. It does not change the product price, inventory, or SKU.
Nine input types are available: Single-line text, Multi-line text, Buttons, Checkboxes, Color picker, Date picker, Dropdown, File upload, and Swatches.
When to use it for a product note
Section titled “When to use it for a product note”Choose Custom option when you need to position fields on a product template, collect separate values such as an engraving name and a gift message, require an answer, or collect choices and files as well. Use Single-line text or Multi-line text for written notes. Both types can also be optional.
For the same optional text note across products, especially when shoppers should enter it inside the quick-view dialog, use Theme settings → Product note. It shares one configuration between the full product page and quick view. It cannot appear only in quick view or require an answer.
| Comparison | Custom option text content block | Global Product note |
|---|---|---|
| Configuration scope | The product template’s Product settings; products using that template share its fields | Shared Theme settings, with per-product scope controlled through custom.product_note |
| Text fields | Several fields with separate names, positions, help text, and required settings | One optional note with a shared label, character limit, and single-line or multi-line setting, above the purchase buttons |
| Full product page | Shows the current template’s fields. The Product content purchase card and mobile purchase bar submit the same inputs | Shows the same note according to the main switch and product scope |
| Quick view and direct quick-add | Do not show these template fields. Set custom.pawly_customization to True so quick-purchase entries lead to the product page | Ordinary products can collect it in quick view. Direct quick-add has no note input and can skip it |
The two product metafields are not interchangeable. custom.product_note controls only global note visibility. custom.pawly_customization sends personalized products from quick-purchase entries to the full product page. Adding Custom option still requires the latter flag; enabling a global note does not replace it.
Product notes in Product content is information provided by the merchant, not shopper-entered notes. The cart’s order note describes the whole order and is not tied to one item.
Add it to a page
Section titled “Add it to a page”- In Shopify admin, open Online Store → Themes and open the theme editor for the theme you want to change.
- Select the product template, then open Product → Add block → Custom option.
- Move the content block near the variant picker and purchase buttons.
- Choose Option type, enter a unique Option name, and write a clear Option label.
- Configure the relevant limits, save, and complete the product-level setup below.
Use different product templates when different products need different fields. A field added to a shared template appears for products using that template.
Set it up: quick start
Section titled “Set it up: quick start”- Choose Single-line text and set Option name to “Pet name.”
- Set Option label to “Name to engrave,” enable Make required, and set Maximum text length to 20.
- Create a product metafield definition with namespace and key custom.pawly_customization and type True or false.
- Set that field to True on every product requiring personalization, then save each product.
- On the storefront, check a product card and quick-purchase entry: they should lead to the full product page for that product.
- Enter a name, change a variant, add the item to the cart, and check that the name stays attached to the correct line.
To create the definition, open Settings → Metafields and metaobjects (shown as Custom data in some admin layouts), choose Products, and add a definition. Shopify explains creating custom definitions and setting product values.
Settings
Section titled “Settings”| Setting | Default | Options | What it does |
|---|---|---|---|
| Option type | Single-line text | Single-line text; Multi-line text; Buttons; Checkboxes; Color picker; Date picker; Dropdown; File upload; Swatches | Choose how shoppers provide this value. Only settings relevant to that input type affect it. |
| Option name | Empty | Text | Use a unique name for the value shown with the cart item and order. Do not start with _. If empty, Option label is used. Square brackets are changed to parentheses. |
| Option label | Personalization | Text | Write the customer-facing field label. Keep it distinct from other personalization and note fields. |
| Help text | Empty | Text | Explain what to enter, choose, or upload. |
| Make required | Off | On / Off | Require a value in the theme’s purchase flow. Checkboxes require at least one selection; Color picker already has a default color. |
| Choices | Empty | Multiple lines | For Buttons, Checkboxes, Dropdown, or Swatches, enter one choice per line. Swatches can use Label|#hex. |
| Placeholder | Empty | Text | Give a short input hint for text fields. A hint is not submitted as the shopper’s answer. |
| Maximum text length | 200 | 20–500; step 10 | Limit Single-line text and Multi-line text to this many characters. |
| Minimum selections | 0 | Number | Set the minimum number of checkboxes. Zero adds no minimum; Make required still requires at least one. |
| Maximum selections | 0 | Number | Set the maximum number of checkboxes. Zero means no maximum. Do not set it below the required minimum. |
| Earliest date: days from today | 0 | Number | Set the earliest date as the shopper’s local today plus this many days. Negative values are treated as zero. |
| Latest allowed date | Empty | Text | Optionally set the latest date as YYYY-MM-DD. It must not be earlier than the earliest allowed date. |
| Accepted file types | .jpg,.jpeg,.png,.pdf | Text | For File upload, enter comma-separated file extensions or file types. Shopify still performs its own upload validation. |
| Maximum file size (MB) | 10 | 1–20; step 1 | Set the theme’s browser-side size limit for one file. This is not a guarantee of Shopify’s accepted upload size. |
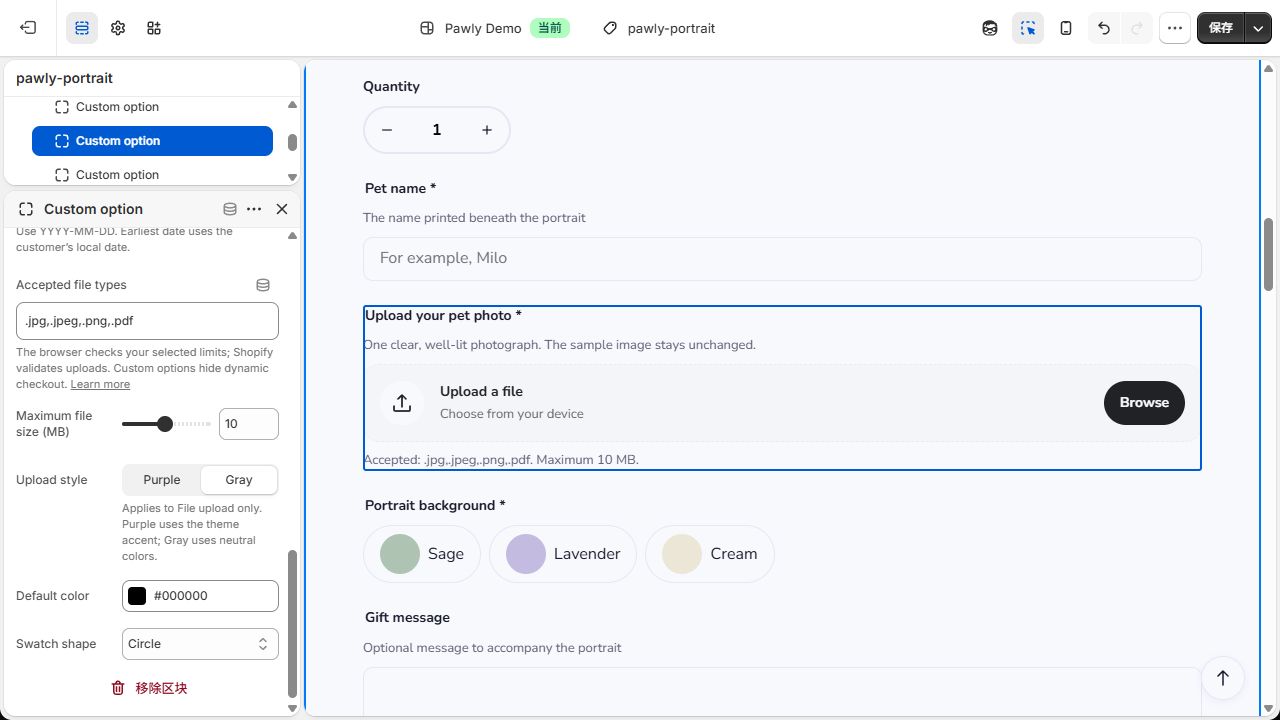
| Upload style | Purple | Purple; Gray | For File upload only. Purple uses the theme accent; Gray uses a neutral gray background and dark gray button. Set each upload block independently. |
| Default color | #000000 | Color | Set the initial hex color for Color picker. This does not select a stock-managed product variant. |
| Swatch shape | Circle | Circle; Square; Rectangle | Choose the shape of Swatches. It does not change the submitted choice. |
Images and content tips
Section titled “Images and content tips”For color swatches, put one choice on each line, such as Lavender|#cbbbe7 and Sage|#a9bda4. The choice label, rather than the hex value, is saved with the item.
For a material image, upload a PNG to Content → Files named product-option-option-name-choice.png, using lowercase words and hyphens. For Option name “Paper style” and choice “Lined,” use product-option-paper-style-lined.png. A square image of at least 120 × 120 px is recommended. The image takes priority over the color; a choice without either still has its text label.
For File upload, the file is sent when the shopper adds the product to the cart. Selecting a local file alone does not mean it has uploaded. Each upload content block accepts one file; add differently named content blocks for several files.
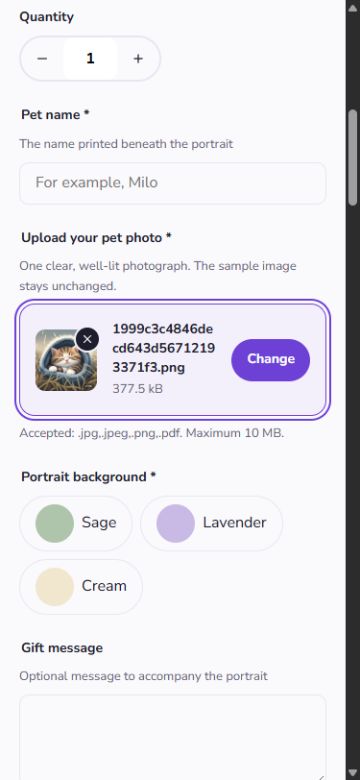
After a file is selected, its item shows the name and size. Images that can be previewed also show a thumbnail; other files and images that cannot be previewed keep the icon. Select the thumbnail, file name or Change to choose a replacement. Select the round close icon in the thumbnail’s top-right corner to clear the selection (its tooltip reads Remove file). The thumbnail confirms the selected photo; it does not change the sample finished artwork shown on the product page.
To change the upload field’s style, return to its Custom option under Product and confirm Option type is File upload. Scroll to Upload style, select Purple or Gray, check the preview, then select Save. The default is Purple. This changes only that upload field, rather than other inputs or the store’s overall colors.
Good to know
Section titled “Good to know”- Set custom.pawly_customization to True for each personalized product. Adding a template field alone does not tell product cards or other quick-purchase entries that personalization is required. Clear the flag when a product no longer needs personalization.
- Gift-card quick-purchase entries also lead to the full product page for the separate recipient form.
- When Product has any Custom option content block, its dynamic checkout control is hidden. Shoppers complete personalization, add to cart, then check out normally.
- Color picker and Swatches collect a preference. Use actual product variants for options that change stock, price, or fulfillment.
- A quantity of three on one cart line means three items share the same personalization. For different names, add each separately. Different personalization can create separate lines for the same variant.
- Both methods can collect different information. For example, use “Pet name” for the Custom option’s Option name and “Item note” for Product note’s Note label. If both collect the same message, keep one input. With global notes set to All products, set custom.product_note to False on that personalized product, or exclude it using Selected products (metafield).
- Do not duplicate the global Note label in Option name on the same product. If Option name is empty, check its fallback Option label. If Note label is empty, check the default Note label in the actual storefront language. Duplicate names trigger a field conflict and block adding from the product page.
- The Product content purchase card and mobile purchase bar use the main product form, including its chosen files. Variant changes preserve inputs; leaving or refreshing the page may clear them.
- The cart does not provide an editor for these values. Remove the line and add it again to change personalization. Check order details and any notification templates you rely on; email display can depend on those templates.
- Some checks, including checkbox counts, relative earliest dates, file-size checks, and duplicate-name checks, need browser scripting. These checks are not a server-enforced business rule.
Example setups
Section titled “Example setups”Pet-name engraving: choose Single-line text, Option name “Pet name,” Maximum text length 20, and Make required on. Set the product customization flag to True. Any engraving charge must already be reflected in a real product or variant price.
Pet portrait upload: choose File upload, Option name “Pet portrait,” Accepted file types “.jpg,.jpeg,.png,.pdf,” Maximum file size (MB) 10, and Make required on. Set the product flag to True and test that the uploaded file link appears with the cart item.
Common questions
Section titled “Common questions”Why can a quick button still skip the fields? Check the product’s customization flag, its assigned template, and the actual quick-purchase entry you are testing.
Do I need Custom option for one optional message? Not always. Use Product note for shared settings and entry inside quick view. Use a text Custom option for a field specific to a product template, a different position, or separate help text, and complete this guide’s quick-purchase setup.
Can shoppers complete Custom option inside quick view? Not currently. The note in quick view comes from global Product note, not from the template’s Custom option. With custom.pawly_customization correctly set, personalized products lead to the full product page. Do not clear the flag to restore quick view, as other personalization could be skipped.
Can a choice add a fee? No. These inputs do not alter the price. Use a correctly priced product or variant for paid options.
Why is the field not visible? Confirm the product uses the intended template and that choice-based fields have real choices.
How do shoppers change a chosen file? Use Change to select another file or the round close icon in the thumbnail’s top-right corner to clear it before adding to cart. Once added, remove the cart line and add it again with the replacement.